
“`html
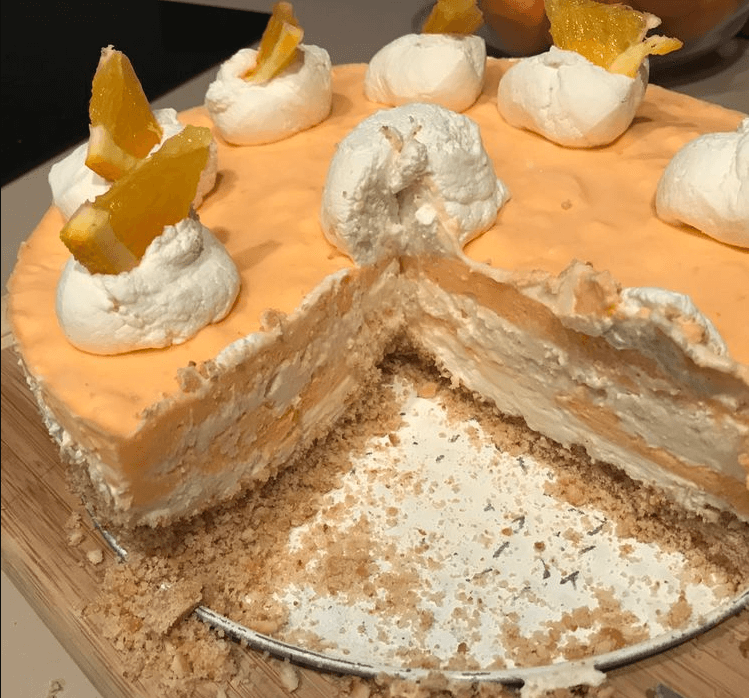
If you are a fan of Creamsicles, you’re going to want to make this No Bake Orange Creamsicle Cheesecake this summer. You’ll find a delicious Nilla Cookie crust with layers of orange creamy cheesecake filling. Perfect for summer picnics and BBQ’s.
I love making no-bake cheesecakes. They are so simple to make and always taste so delicious. During the summer months, I am one who does not like to turn on my oven. So no-bake desserts are always best. No need to heat up the house or myself, ha ha. Light and fruity desserts are always great when warm weather hits. I serve them when we have our summer BBQs. If you need a great summer dessert for a potluck, picnic, or BBQ, you will want to make this. Trust me… everyone will LOVE it!
This No Bake Orange Creamsicle Cheesecake will be made MANY times in my kitchen this spring and summer. As you can see from the pictures, it looks light and dreamy and so impressive, sort of like a Creamsicle Bar. Since my family loves Creamsicle bars, I knew they would enjoy this amazing dessert.
Why You’ll Love This Recipe
This cheesecake is a delightful combination of refreshing orange flavor and creamy cheesecake goodness, all without the need to turn on your oven. It’s perfect for warm weather gatherings and is sure to be a hit with everyone who tries it.
Kitchen Equipment You’ll Need
- Food processor
- 9″ springform pan
- Electric mixer
- Medium mixing bowls
- Whisk
- Spatula
Ingredients
- 11 oz Vanilla Wafer Cookies
- 1 1/2 cups Sugar, divided
- 4 tbsp melted Butter
- 16 oz Cream Cheese, softened
- 16 oz Heavy Cream
- 1 (3.3 oz) box Orange Gelatin
- 1 cup boiling Water
- Zest from 1 Orange
- 1/4 tsp Vanilla Extract
- 1/2 cup Powdered Sugar
Instructions
- Put vanilla wafers in a food processor and pulse until finely chopped.
- Add 3/4 cup sugar and melted butter, and pulse to incorporate.
- Grease the bottom and sides of a 9″ springform pan.
- Press the mixture into the bottom and slightly up the sides of the pan.
- Place in the freezer for 30 minutes.
- Beat cream cheese and remaining sugar until smooth.
- In a medium bowl, combine gelatin and boiling water. Whisk until dissolved. Set aside.
- Zest the orange and set aside.
- Whip heavy cream, powdered sugar, and vanilla until stiff peaks form.
- Add half of the whipped cream mixture to the cooled gelatin and add orange zest. Whisk to blend. Set aside.
- Fold the remainder of the whipped cream mixture into the cream cheese mixture.
- Spread half of the cream cheese mixture over the crust.
- Pour 2 cups of the orange whipped cream mixture over the cream cheese mixture.
- Gently spread the remaining cream cheese mixture over the orange mixture.
- Pour the remaining orange whipped cream mixture over the cream cheese mixture.
- If desired, take a butter knife and gently glide through the cream cheese layers to swirl.
- Refrigerate for at least 6 hours.
Tips for Success
- Ensure the cream cheese is softened before mixing to achieve a smooth texture.
- For an extra burst of orange flavor, add more orange zest to the cream cheese mixture.
Additional Tips or Variations
Try adding a layer of chopped fresh oranges or mandarins for added texture and flavor. You can also experiment with different flavored gelatins for a unique twist.
Nutritional Highlights (Per Serving)
While exact values may vary, this cheesecake is a sweet indulgence with a creamy texture and refreshing citrus flavor.
Frequently Asked Questions (FAQ)
Can I make this cheesecake ahead of time?
Yes! This cheesecake can be made a day in advance and stored in the refrigerator until you’re ready to serve.
Can I use a different type of cookie for the crust?
Absolutely! Graham crackers or digestive biscuits make a great alternative to vanilla wafers.
Conclusion
This No Bake Orange Creamsicle Cheesecake is the perfect treat for any summer occasion. Its light, creamy texture and refreshing orange flavor are sure to impress your guests. Give this recipe a try and share your experiences with us. We can’t wait to hear how much you and your loved ones enjoyed it!
“`
Wow that’s delicious